Friendly fire tragedy at Lewes (Part 1)
Posted: 20 July 2015 20:00
In 1941 the War Office began requisitioning large tracts of the South Downs to use for battle training involving tanks, artillery and infantry. With large-scale exercises using live ammunition taking place, accidents could - and did - happen.
A series of exercises was conducted in mid-1942 on the Downs between Lewes and Stanmer; two accidents occurred in four weeks, causing the deaths of seven men.
This article is in 3 parts; this piece will reconstruct the troop movements and artillery bombardments during a Canadian Army exercise, Part 2 examines a fatal accident and Part 3 will describe other incidents.
The need for change
Early 1942 marked the low point of the war for the British people; the devastating German campaigns in the west had seen the Allies soundly defeated in France and the Low Countries in 1940, the Balkans in 1941 and the Japanese were rampaging unchecked across the Far East. The turn of the tide against the Germans at El Alamein and Stalingrad was still months away.
It was realised that an assault would have to be made against Occupied Europe, but also that a new army had to be built from the ruins of the old. The British Army that had gone to France in 1939-40 trained in the art of trench warfare now had to retrain to fight as the Germans did.
Troops in Sussex in April 1940 were conducting large-scale trench digging exercises, learning to patrol No Man's Land and launch trench raids. The events of May and June effectively consigned these methods to the history books.
Battle Drill
The first step towards a modern doctrine was known as Battle Drill; in 1941, fieldcraft was also increasing in prominence in training. These concepts placed a greater emphasis on the individual soldier to be aware of the general plan of attack and act on his own initiative rather than stand around in a trench awaiting orders from an officer. This new doctrine saw troops being taught how to move rapidly and stealthily around the battlefield, using cover and camouflage, fire-and-manoeuvre. Linear defence strung out in First World War-style trench systems was abandoned; mutually-supporting all-round defensive positions using temporary slit trenches from which offensive action could be launched were now in vogue.
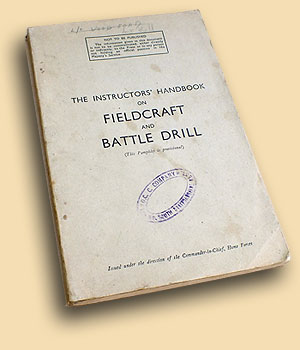
All of this new doctrine lead to the Infantry Training 1937 manual being overhauled. Supplements and new pamphlets appeared; one of these interim publications was The Instructors' Handbook on Fieldcraft and Battle Drill. Printed in October 1942, it provides an invaluable insight into the psychology of the preparation of Anglo-Canadian forces in the UK to fight the forthcoming battles on mainland Europe.
A couple of passages from the handbook are of particular interest:
The Blitzkrieg
This is a "Blitzkrieg" war in which the soldier moves from 100 per cent peace to 100 per cent war overnight. In the last war troops had time to get "seasoned." They were taken to France, put in a quiet sector of the line, and gradually worked up to more lively sectors by easy stages. Troops now have no opportunity to get seasoned....The unseasoned soldier is suddenly plunged into terrifying circumstances....
Use of live ammunition
The essence of battle drill training is the use of live ammunition. As soon as men have thoroughly learnt the various drills, they should be made to put them into practice in the field, using all their weapons with live ammunition. The importance of this cannot be sufficiently stressed as it is the only way in which the true realism of battle training can be introduced. There is all the difference in the world between an exercise in which bullets, grenades, and mortar bombs are imaginary and one in which they are real. In the former none of the all-important problems of fire-control, fire and movement, the co-ordination of covering fire, ammunition expenditure and replenishment, hitting the enemy and avoiding hitting your own troops, arise. Without the opportunity of overcoming these problems, which can only be done by frequent practice, no unit can be really properly trained. No platoon which cannot efficiently carry out such an exercise can be considered fit to fight.
These are significant points; in April 1940, 12 Infantry Division that had recruited from Kent, Surrey and Sussex, was sent to France to undertake Lines of Communication tasks (i.e., general labour) and then to conduct its basic training. The Division suddenly found itself a few weeks later in the line of advance of the German assault through France, facing tanks, infantry and dive-bombing before it had undergone training. Many men had never even fired a rifle; casualties were so high that the Division was disbanded once the survivors had made it back to the UK.
In order to be able to subject troops to battle inoculation before they experienced the real thing, the War Office had to find large tracts of land in which to expose them to the noise and danger of battle in controlled conditions. One such expanse was the South Downs, and several blocks from the River Arun to Eastbourne were duly requisitioned.
It is common knowledge that troops conducted training on the Downs during the war, but nobody has ever sat down and studied the nature of that training, let alone reconstructed and plotted the progress of such an exercise - until now.
Lewes Field Firing Range
The range lies between the County Town of Lewes and the village of Stanmer, just north of Brighton. The landscape here comprises rolling hillsides and valleys ranging in height of 50 - 200m above sea level.
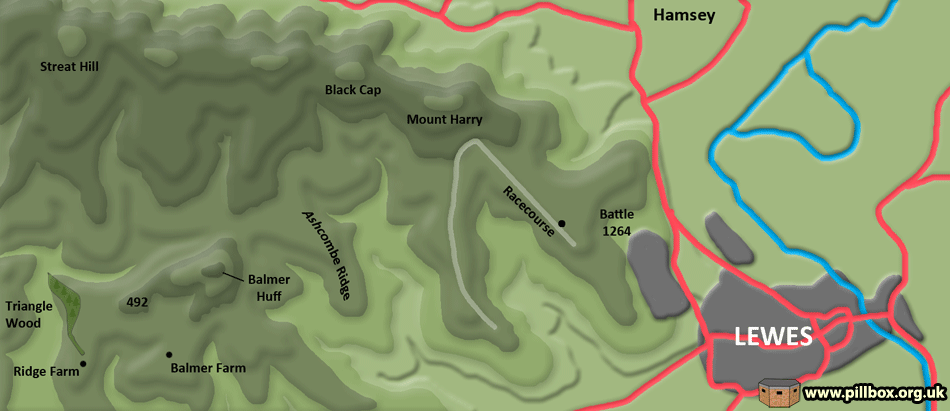
We will examine the exercise using the map below. We can see the northern edge of the Downs has key outcrops of high ground, such as Mount Harry, Black Cap and Streat Hill; these are 195-210m above sea level. The ground then slopes away to the south, with a high outcrop known as Balmer Huff (170m) surrounded by lower hills. Below Mount Harry is Lewes Racecourse and just to the east is the site of the Battle of Lewes in 1264. At the foot of the Downs, the town of Lewes sits in a valley through which runs the River Ouse.
The Exercise
The exercise we'll be looking at is that conducted by 2 Canadian Infantry Brigade on 19-21 July 1942. There were actually two exercises taking place over the three days; one with infantry advancing with artillery support, and the same advance with tank support. Such was the complexity of the landscape and the need for careful planning of artillery bombardment, that each exercise was rehearsed without live ammunition. The programme was as follows:
19th July: Reconnaissance of area and infantry rehearsal of attack. No firing.
20th July: Morning - infantry attack with live ammunition. Afternoon: reconnaissance for infantry/tank attack.
21st July: Morning: rehearsal of infantry/tank attack. Afternoon: Exercise with live ammunition.
Exercise Scenario
The exercise was designed to test an infantry brigade advancing with artillery support on the outer defences of Paris (Brighton). On the map, the enemy were holding the ground from Streat Hill to Balmer Farm, with a strong defended locality on Balmer Huff and a line of outposts on Ashcombe Ridge. Starting from the western arm of the race course, the brigade was to advance westwards. Phase 1 was to capture Ashcombe Ridge, Phase 2 to occupy Balmer Huff, while Phase 3 was to exploit further forward into the enemy line.
Troops involved
This was a big exercise; an infantry brigade has a strength of about 3,000 men. Such a force would normally have a field regiment of artillery (about 700 men) to support it, but on this occasion, the entire divisional artillery (excluding the anti-tank regiment) of three field field regiments was in support. This gives us a total of over 5,000 men before we add in other services such as the machine gun company and medical services.
| Units participating in Battle Shoot at Lewes, 20 July 1942 | ||
|---|---|---|
| Infantry | Artillery | Medical |
| 2 Canadian Infantry Brigade | Commander, Royal Canadian Artillery (CRCA), 1 Canadian Division | Assistant Director, Medical Services (ADMS), 1 Canadian Division |
| Seaforth Highlanders of Canada | 1 Canadian Field Regiment | 4 Canadian Field Ambulance |
| The Edmonton Regiment | 2 Canadian Field Regiment | 2 Casualty Clearing Station |
| Princess Patricia's Canadian Light Infantry (PPCLI) | 3 Canadian Field Regiment | 1 Motor Ambulance Convoy |
| 'A' Company, Royal Montreal Regiment (MMG) | 1 Canadian Survey Regiment | |
Reconstructing events
I've chosen to focus on the infantry/artillery exercise of 20 July for two reasons. Firstly, the best descriptions over the three days are of this exercise; the whole spectacle of artillery, mortar and machine guns hammering the hillsides has an impact on those compiling the war diaries. The addition of tanks to the exercise on the 21st is of interest, but the descriptive superlatives, excitement and detail is mostly devoted to the 20th. Secondly, we have a friendly fire tragedy that needs investigation.
The reconstruction below is the product of gleaning the intricate detail from the war diaries of the units listed above; it has proved to be somewhat of a nightmare trying piece it all together. While there are many documents (particularly from the artillery point of view) in the records, this exercise was run several times in July and August 1942 by different units; the sometimes poor quality paper used makes it hard to read the detail and date of the exercise the information relates to.
There are also discrepancies between the given timings and those recorded in the war diaries of units involved. Some elements, such as the machine gun (MMG) fire plan, we only have passing reference to; the Royal Montreal Regiment diaries don't give us any detail beyond the fact that one of their companies was involved in the exercise. We know from the infantry diaries that they were on the right flank, but that's about all.
We also have problems with place names and features on the map; the documents talk about "Balmer Down" being the key objective, but if you look at the modern Ordnance Survey map, the feature so marked does not fit in with the flow of the exercise. However, the 1941 OS map shows the feature identified on modern maps as "Balmer Huff" actually marked as "Balmer Down." A similar situation arises with "Ashcombe Ridge"; it's not named as such on old or new maps, but the army needed to give the feature a name in order to refer to it conveniently. The ridge overlooks the valley known as "Ashcombe Bottom", hence its adoptive name. Similarly, the un-named wood at the western end of the exercise is identified as "Triangle Wood" due to its shape. I have retained these unofficial names with the exception of the Balmer Huff/Down anomaly. As Balmer Down is further east of Balmer Huff, I have used the latter name instead to avoid confusion when using the modern map.
The maps
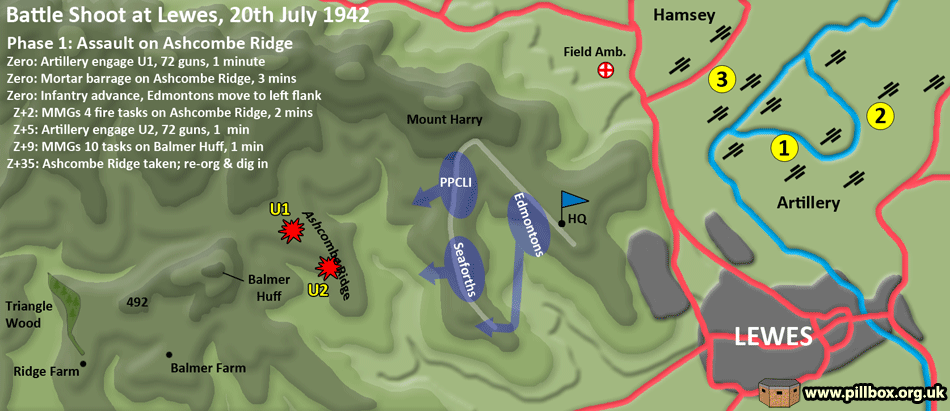
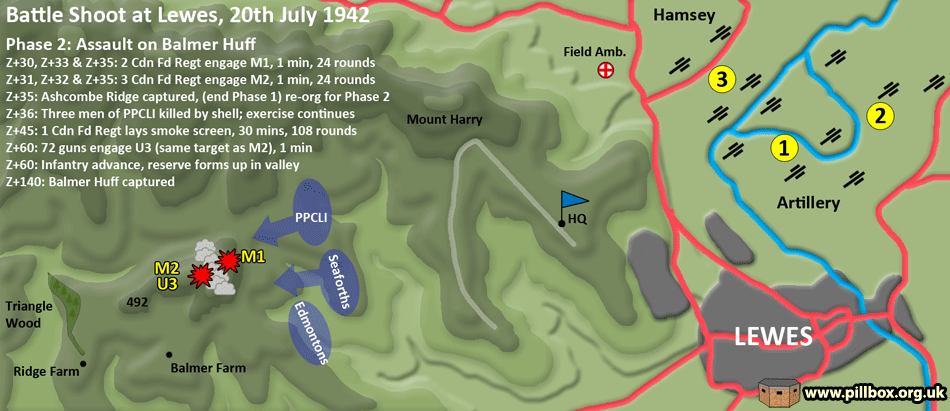
I decided to describe events through the use of the three maps below, each representing one stage of the exercise. In normal circumstances I would never fill a graphic with as much information as you see here, but I felt that the timings and other detail was best put on the map rather than attempted as a textual description. Not everyone will be interested in the minutiae provided, or be able to comprehend it; the level of detail and contradictory documents made it exceptionally difficult for me to follow events and produce these graphics in the first place, so don't worry if you're not an armchair general! If you don't want to get bogged down in the timings on the graphics, just follow the troop movements and artillery concentrations in conjunction with the descriptive text.
If the exercise run-through does prove too much for you, then feel free to jump to Part 2 and read about the accident.
The timings are given using the reference 'Zero' or 'Z', which was the start time (09:30 on the July 20th). The timings are expressed in minutes after Zero, i.e., Z+2 means 09:32. The artillery concentrations are prefixed with a 'U' or 'M'; these are 'Uncle' or 'Mike' targets, employing the 72 guns of a division or the 24 guns of a regiment, respectively.
Phase 1: Assault on Ashcombe Ridge
The first graphic shows the troops in their start positions and the artillery fire tasks to cover their advance. Note the locations of 1, 2 and 3 Canadian Field Regiments; they're situated on the much lower ground at Hamsey, shooting over the top of the Downs onto the first targets about three miles away. Brigade HQ was established in the grandstand at the racecourse. The infantry battalions are on the start line at Lewes Racecourse; the PPCLI on the right flank, Seaforths on the left; these are the forward battalions. Behind them are the Edmontons who are the reserve, their task is to move around the left flank after the other battalions have begun their advance.
The photo below shows the view from the start line; Balmer Huff is about 1.4 miles away on the map, but there are valleys and hills to negotiate before the troops get there.

The scene is best described by those who were there; the war diary of the Edmonton Regiment first:
All troops behind the start line by 0800 hours. Zero is set for 0930 hrs. Today is rather dull and it looks as though we may get some rain. At zero leading elements of PPCLI and Seaforths of Canada pass start point. At the same time the artillery concentrations opened up on Ashcombe Ridge. It certainly makes things realistic and everybody is putting their backs into this attack.
The Seaforths were also impressed by the barrage that preceded their attack:
The battalion moved off at 0930 hrs, halting temporarily on the crest of the hill to observe the concentration of fire of the entire Divisional Artillery 25-pounders, 72 in all. Then the 3-inch mortars opened up with smoke and HE literally blasting hell out of the eastern slope of Ashcombe Ridge. Under cover of this smoke screen the companies moved forward, putting up a wall of fire of their own. The battalion snipers were occupied entirely on the left flank during this move, putting up a crossfire to deal with any enemy who might have shown themselves after the first move of our rifle companies.
The barrage lasted six minutes; at Z+35 (10:05) the infantry took Ashcombe Ridge. Five minutes previously, the next artillery barrage had opened up on the next objective, Balmer Huff.
Phase 2: Assault on Balmer Huff
Phase 2 began five minutes before Ashcombe Ridge was taken. The infantry began to reorganize and dig in on the ridge while the artillery softened up the "enemy" on Balmer Huff, prior to an infantry assault supported by mortars. It is then that the tragedy happened; the artillery were engaging targets M1 and M2, when a shell that should have landed on M2 fell short and hit the PPCLI.
The PPCLI war diary:
Bad luck dogged the footsteps of the "Patricias" all morning. A 25-pounder shell fell 800 yards short and landed in the midst of "Charlie" Company, killing three men. On the second phase, a man from "Don" Company was hit by a fragment from a 3-inch mortar bomb. He was rushed to hospital and the fragment removed.
The medical response
The ADMS of 1 Canadian Division was experimenting with a new set-up of a Field Ambulance on the exercise. This comprised the HQ and two bearer sections of 4 Cdn Field Ambulance, with one additional bearer section each from the Division's 5th and 9th Cdn Field Ambulances. Also present were two sub-sections of 1 Cdn Motor Ambulance Convoy. These units were all stationed on the low ground, near Coombe Place at Offham.
The Field Ambulance was busy throughout the exercise; not only were officers from other units inspecting the new layout, but the exercise included simulated casualties for the medics to process. The 10 ambulances of 1 MAC evacuated a total of 153 casualties (real and simulated) during the exercise.
However, the war diary of the ADMS tells us that:
The exercise was marred by a "short" from one 25-pounder gun which killed two personnel of the PPCLI and seriously injured a third (he later died in the Field Ambulance).
The fact that one of the men survived until after he was evacuated is interesting. The ADMS mentions that the casualties arrived at the Field Ambulance just 35 minutes after the incident, and this was due to another modification to the medical layout. A signal vehicle had been laid on with its set tuned to listen in on the Brigade radio net; the medics had presumably heard reports of the incident and moved off immediately to the scene.
Having been unable to save the casualties, 4 Cdn Field Ambulance reported that "the spirit of the men was somewhat dampened" by the tragedy.
The exercise continues
We'll return to the accident in detail later; meanwhile, the exercise continued, the gunners as yet unaware of what had happened. 1 Cdn Field Regiment began laying the smoke screen across Balmer Huff about ten minutes after the accident, but this was halted as orders to cease firing until the guns could be checked were dispatched. Only 1 Cdn Field Regiment got the message as they were in contact with observers near the scene. 2 and 3 Cdn Field Regiments continued firing, moving onto target U3, just as the infantry advanced across the valley below Balmer Huff covered by the smoke screen.
The forward battalions were supported by MMG fire and mortars; in addition to the PPCLI casualty, the Seaforths also had mortar problems:
The three mortars were to throw smoke onto the objective and Sgt C. Wiper, who was in charge of the party, observed only two smoke bombs. On checking, he found the mortar-men vainly attempting to push the bomb down the barrel. Rushing back he told them to unscrew the barrel to find out what the trouble was. They didn't know how. Disgustedly, Sgt Wiper went at it himself, and upon removing the barrel found a sock, which had been used as a cleaning rag, jammed between the base plate and the bomb. Lots more lead flying around, some of it with too deadly accuracy.
At Z+140 (12:50) Balmer Huff was taken; the Edmontons had formed up in the valley between Ashcombe Ridge and Balmer Huff and had moved further forward to establish their HQ at Balmer Farm. Ammunition and supplies were brought up in trucks to replenish the fighting troops.
The photo below is the view from Balmer Huff back towards Ashcombe Ridge and the start line.

Phase 3: Exploitation by the Edmontons
The final phase saw the Edmonton Regiment striking out from the left flank to exploit into the enemy's front line. Two bombardments on targets M4 and M5 were undertaken.
The Edmonton diary gives us details down to Company level; all of the moves during the exercise would involve this sort of tactical bound by companies and platoons, but the documents mostly don't provide this information. "C" Company would be in reserve at Battalion HQ, "B" Company would take Point 492 on the right flank, "D" Company would take Ridge Farm, and with these objectives secured, "A" Company would push forward down the middle and take Triangle Wood. The assault on Point 492 was supported by smoke and HE mortar fire from the Edmonton's own mortar platoon, as well as those of the PPCLI and Seaforths on Balmer Huff.
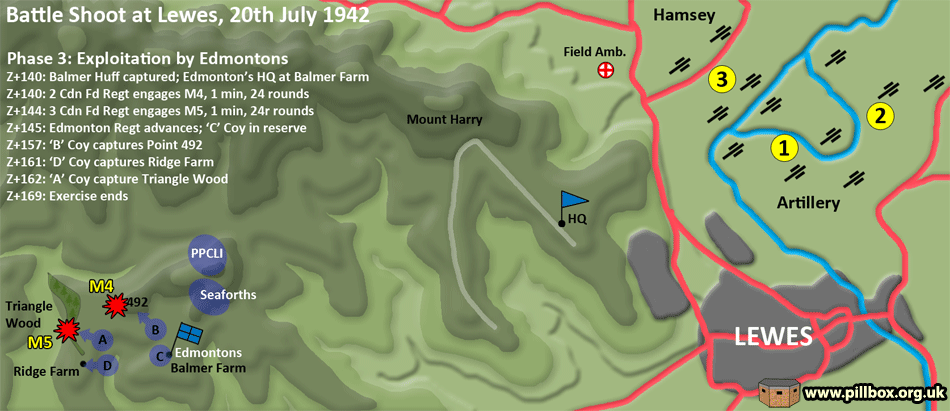
The photo below is the view of Point 492 and Triangle Wood from Balmer Huff; the Edmonton's attack was delivered from the left flank.

The photo below is taken from Point 492 towards the HQ at Balmer Farm.

The aftermath
Aside from the casualties, it was felt that the exercise had gone well and provided valuable training experience for those involved. The infantry had experienced working with artillery, the artillery and HQ staff had experienced putting together an intricate fire plan that was timed to the minute. The medical services had experimented with a new layout, and this seems to have been successful in speedy evacuation of the casualties caused by the tragedy. The supply services had worked well, following up the infantry advance and replenishing ammunition.
This is precisely the idea behind battle drill and live fire exercises; techniques put to the test and adjusted in order to be better the next time. The casualties were a tragic reality check regarding the horror of war, and those involved would have had a bitter taste of battle closer to the real thing than anticipated.
The importance of reconstruction
The documents have allowed me to reconstruct the exercise in minute detail, but is this really important? There is a temptation to view the situation in the UK solely in terms of the Battle of Britain, the Blitz, the invasion scare, the build-up to D-Day and the V-weapon campaign. These are all associated with real 'action' and 'fighting' and spark the imagination far more than seemingly mundane training exercises.
I think this is a serious omission from the story of East Sussex during the war; what you see above is an insight into how Anglo-Canadian forces were reinventing their way of fighting. This training was the preparation for the battles on mainland Europe; in just one year's time, 1 Canadian Division would be fighting in Sicily and Italy before being transferred to the Western Front in March 1945 and participating in the liberation of the Netherlands.
For many Anglo-Canadian divisions, the long road to these battles of liberation effectively began here on the training areas of Sussex and this is why I felt it necessary to piece together this exercise. I've amassed an enormous amount of material relating to such exercises and it was always my intention to reconstruct one and relate it to the landscape. Now that I've done this, I feel that I have a much greater understanding of how far things had come since 1940.
There was still work to do, however, including determining the circumstances in which three men lost their lives.
Post-exercise activity
The exercise ended at midday and the afternoon was for officers to conduct reconnaissance for the tank exercise the following day. The Edmontons were praised by the Brigadier for the speed and efficiency of their exploitation, while the Seaforths took time to relax:
The troops spent an easy time laying in the sun, reading, and writing letters. It's been a grand warm day and the evening was a perfect example of how pleasant the Sussex Downs can be at this time of year. Our new Padre, Captain Durnford, with the aid of the Pipe Band and a few of the fellows from Battalion HQ and "B" Company, started a sing-song which soon developed into a choir of the Battalion en masse. Not to mention a few of the Edmonton Regiment who strolled over.
However, while the Edmontons and Seaforths enjoyed the summer evening (the mood in the PPCLI is not recorded, but one can only imagine how they were feeling), their comrades in the artillery were soul-searching for a reason as to what had gone so tragically wrong.
In Part 2 we'll examine the incident in detail.
- Pete

Email:
Blog Latest
Bishopstone reveals its pillbox secrets
18 October 2021
Pillbox or Observation Post?
10 June 2020
Uncovering the hidden secrets of a pillbox
8 June 2019
Review of 2018
31 December 2018
Wartime Christmas in East Sussex (2)
24 December 2018
Jargon-buster
Defended locality
An area defended by a force (e.g. a platoon) occupying a series of defence works, normally within a barbed wire perimeter. Localities were designed for all-round defence and usually fitted in with a coordinated scheme of neighbouring localities.
Slit trench
Small, narrow trench designed to provide protection against shrapnel and other battlefield hazards. Technically distinct from a weapon pit (which was intended soley as a defensive position) slit trenches were also used as defence works.
War diary
A record of events kept by all units from the point of mobilisation. A diary's contents vary enormously from unit to unit; some give detailed entries by the hour on a daily basis while others merely summarise events on a weekly/monthly basis.
This site is copyright © Peter Hibbs 2006 - 2026. All rights reserved.
Hibbs, Peter Friendly fire tragedy at Lewes (Part 1) (2026) Available at: http://www.pillbox.org.uk/blog/239683/ Accessed: 16 April 2026
The information on this website is intended solely to describe the ongoing research activity of The Defence of East Sussex Project; it is not comprehensive or properly presented. It is therefore NOT suitable as a basis for producing derivative works or surveys!