Pillboxes for dummies (Part 2)
Posted: 21 September 2015 20:40
Five years ago I discovered some 1941 plans for building a dummy pillbox in the archives. I spent this summer actually building one as an archaeological reconstruction.
I wrote what is now part 1 of this Pillboxes for Dummies series back in 2010, explaining the background to this interesting facet of subterfuge.
")
A dummy pillbox was designed to deceive the Germans into thinking that the defences were stronger than they actually were.
The plans describe either canvas or plasterboard mounted on a timber framework and painted to look like concrete.
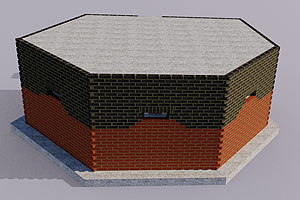
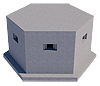
The graphic at right shows a 3D model of a dummy Type 22 pillbox (minus roof), showing the wooden framework.
The project was sparked by a conversation between fellow Sussex Military History Society member Paul Connor and myself.
In January 2015, Paul suggested we create a life-size Type 24 pillbox frontage out of plywood to use as a backdrop for our SMHS historical displays. This suddenly jogged my memory back to the dummy pillbox documents; we could do an archaeological reconstruction from the original plans and also use the finished product instead of a gazebo at shows!
The plan was discussed at length and promptly put on the back burner again until we could decide that it was (a) actually possible and (b) a sensible thing to do. Having resolved neither question, and, being blind optimists, we decided to press ahead anyway.
Initial planning
")
The first step was my 3D model; this was used to produce scale plans we could work from. In actual fact, the Sketchup software proved to be essential, from creating plans to calculating how to cut wood with minimal wastage - even the arrangement of display boards!
The final design to be produced is shown at right.
We realised early on that we would have to alter the original plans for one very good reason; the WW2 dummy was designed to be built in situ as a single-piece structure with the vertical poles dug into the ground. Our version had to be able to break down into manageable sections to permit transit and storage. To this end we had to build each wall as a separate, standalone structure - and in two panels, the join being just below the embrasure.
The wartime framework was made of seven different sizes of wood but for reasons of cost and simplicity we opted for just one size. We felt the diagonal cross-braces on the lower walls were too complex and time-consuming for our timescale and skills, so we employed a pair of vertical struts instead.
Our first thoughts were towards using canvas for the walls and roof, but we weren't sure how hard it would be to cut and shape it on a hexagonal frame and make it watertight at the numerous joins. We also had concerns about the canvas stretching with time and weathering. We therefore opted for a structural wall using plywood, and it was in many ways a relief to have arrived at this decision, as it took us away from a fold-up tent design that could fit in a car boot, to a bulky, heavy wooden hut. This meant that we would need to have a roof-rack, trailer or van to transport the pillbox, but once we had entered this territory it meant that we would avoid weight-saving measures that might draw us too far away from the original WW2 design.
Although we had a few departures from the wartime design, we felt that such plans issued in a time of emergency were to be taken more as guidelines. From the documents of the time, we know that the Royal Engineers were constantly improvising defence construction, often using whatever materials could be scrounged locally.
")
First experimental build
Having worked out the plans, on 25 March we decided on a whim to go and buy some wood and see if we could build a single full-size wall if for no other reason than to find out if our plan would work or not.
We took Paul's armoured Snatch Land Rover to a builder's yard and ordered some wood; it certainly turned a few heads as we parked up.
As the timber was too long for the vehicle, we stuck it out of the roof hatch and bungee'd the back doors open to allow the plywood sheets to be carried in the rear crew compartment.
We headed back to Paul's rented workshop to try and make something useful out of our investment.
Despite having a GCSE in CDT Design & Realistion, I was left feeling that we would be relying on Paul to do most of the actual woodworking.
There is nothing distinguished about my school woodwork career; I do recall randomly nailing some bits of wood together and calling it a "mug tree." To this day I'm still not sure whether mum viewed her birthday present as something to hang mugs on or an abomination to be ritually burned to avoid bringing shame on the family.
")
Otherwise, our CDT lessons were mostly spent designing health and safety posters while the woodwork teacher was on sick leave. In one such lesson the entire class outlined their hand on the paper, rubbed out one fingertip and drew a bloody stump with blood spurting everywhere.
Helpful explanatory text on these posters advised "DON'T CUT YOUR FINGER OFF ON THE BAND SAW!" It might have been useful if we had been asked to do this before Sir cut his finger off on the band saw and went on sick leave. (This is actually a true story!)
Anyway, back at the workshop, and still harbouring a childhood phobia of digital amputation, we (I) decided that we (I) should only risk Paul's fingers with the circular saw.
")
Much to my surprise, everything went smoothly; the framework was sized, squared off and nailed together.
The plywood sheeting was cut down with a jigsaw and the embrasure cut out.
After about 3 hours we had produced a single wall; much faster than we had anticipated given that it was our first attempt.
The only issue we encountered was that my original plan required us to build the lower wall panel 15cm higher than the standard size of plywood sheet. We hadn't really considered this and so decided to cut the frame down to fit the plywood and make production simpler.
The result of this was that we were confident we could build the wall sections, even if we didn't yet have any idea as to how we would join them all together, or even how we would make a roof.
The 1/5.5 scale model
Having created the full-size wall, I took it upon myself to build a small-scale model in order to clarify a few points. This might seem to be a backward step (or at least one that should have preceded the full-size wall mock-up), but it proved to be time and resources very well spent.
I'm not sure if I built this model to somehow offset any disappointment for not getting the full-size one built, or just to lay the ghost of my mug tree to rest by (literally) nailing this project.
I bought some wooden beading that was 1/5.5 scale to the wood for the full-size mock-up framework. The ply we had used was only 3.5mm - much too thin, so I decided to use 6mm ply for the model.
")
I was confident building this model; I felt safe using a coping saw as I'd probably stop cutting before completely removing a finger.
In the event, the model turned out far better than I had imagined!
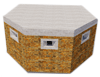
The model is shown at right. I made one embrasure wall and the doorway wall with the full framework as per the plan.
There were two designs of embrasure; one to simulate a stepped loophole with depth, (wall to the right of the door) the one to the left of the door was shallower.
These two walls had the embrasure cut, but the remaining three walls were of minimal construction with the embrasures blacked out in marker pen.
Although it didn't establish how the wall panels could be joined together, one thing the model was particularly useful in establishing was what became known as the "overhang".
")
This was the extension of the plywood sheet beyond the framework on one side of each wall panel, the idea being for the overhang to cover the gap where two squared panel edges meet, to create a sharper angle. We accidentally stumbled upon this concept through our shoddy cutting of plywood on the full-size mock-up.
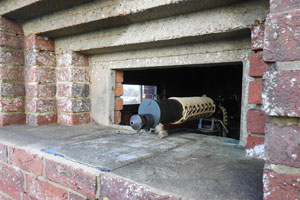
The principle is shown in the photo at right; note how the plywood overhang of the wall panel on the left covers the end of the panel on the right. At full scale, the notch between the two sheets of ply is not noticeable.
The model's usefulness was not yet done, however; the photo below shows the "complete" set up. (The Action Man is 1/6 scale, so slightly too small for the pillbox.) I cut a piece of cardboard for the roof, and pegged a piece of camouflage scarf over it; I then hit upon the idea of using a camouflage net to help secure the pillbox (and it's roof, whatever it might be made of) in position.
I also used some of the walls to experiment with external finishes. The wartime plans talk of coating the dummy pillbox with a cement wash; my attempts to cover the wall seen here (with the shallow embrasure) failed, as the cement, once dry, could be removed by light finger pressure. The walls of this model were subsequently used to test other possible finishes.
")
The mock-up and the model were both successful in that experience was gained and construction techniques were developed, but there was still a long way to go before we had a full-size dummy pillbox...
Part 3 covers the actual full-size construction.
- Pete

Email:
Blog Latest
Bishopstone reveals its pillbox secrets
18 October 2021
Pillbox or Observation Post?
10 June 2020
Uncovering the hidden secrets of a pillbox
8 June 2019
Review of 2018
31 December 2018

Wartime Christmas in East Sussex (2)
24 December 2018
Jargon-buster
Embrasure
A loophole or slit that permits observation and/or weapons to be fired through a wall or similar solid construction.
Loophole
Embrasure
Pillbox
Generic term for a hardened field defensive structure usually constructed from concrete and/or masonry. Pillboxes were built in numerous types and variants depending on location and role.
SMHS
Sussex Military History Society
Type 22 pillbox
A small hexagonal pillbox for six men not commonly seen in East Sussex, though a few still survive along the Royal Military Canal stop line.
Type 24 pillbox
A six-sided (but not a regular hexagon) pillbox. The Type 24 is the most frequently seen pillbox in East Sussex, mostly along stop lines. It can be found in thin wall (30cm) or thick wall (1m) variants.
This site is copyright © Peter Hibbs 2006 - 2026. All rights reserved.
Hibbs, Peter Pillboxes for dummies (Part 2) (2026) Available at: http://www.pillbox.org.uk/blog/239686/ Accessed: 15 July 2026
The information on this website is intended solely to describe the ongoing research activity of The Defence of East Sussex Project; it is not comprehensive or properly presented. It is therefore NOT suitable as a basis for producing derivative works or surveys!