Pillboxes for dummies (Part 3)
Posted: 22 September 2015 20:22
My friend Paul and I built a full-size dummy Type 22 pillbox using plans from 1941; see Part 1 for the history of these dummies and Part 2 to read about planning the project.
This part covers the actual construction of the pillbox and its use as an historical display.
When we first considered building the dummy pillbox, we had it in mind that we would first use it in action at the Hellingly Festival of Transport (FOT), which is held annually over the August Bank Holiday; in 2015 this was August 29-31.
We had had yet another period of inactivity with regards to our cunning plan; with the show looming on the horizon we were almost resigned to not being able to get the final build underway. Looking back now in hindsight, to have deferred until 2016 would probably have killed the project off completely. Then, on Saturday 8 August (just three weeks before the Hellingly show), we decided to bite the bullet and just get it done.
")
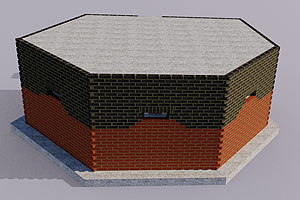
A colour-coded wood cutting plan was drawn up (right, using the 3D model I had originally constructed. An accompanying spreadsheet had calculated the most efficient way to use the wood with minimal off-cuts.
We headed off to another DIY store to get the lumber and other essentials. The plan was slightly scuppered in that we had chosen a Saturday and we now discovered that several big DIY outlets shut at lunchtime. With a limited number of places we could purchase timber, we drove to the nearest one and promptly found that they didn't stock the wood in the sizes we had planned.
")
The first store we tried had a large amount of timber battens on special offer so we bought in bulk, even though the dimensions were not what we had planned for.
What ultimately sold it to us was that the store had a timber cutting service and so we decided this would save us a lot of time and effort. We bought 40 battens, got our 15 free cuts and then paid for the remainder.
As I write this, I'm reminded of how my nerves were as we watched our investment go through the sawmill. If we were cutting the wood ourselves and I had got the cutting plan wrong, we would have realised as we built the first framework and corrected the error. By getting everything cut before we assembled the frames, a single error on my part could have resigned the whole project to the scrapheap.
")
Construction finally begins
Day 1 - August 17
Construction actually commenced just 11 days before we were due to erect the finished product on the showground. Having only an afternoon available to us, we got the first wall built as seen in the photo at right.
We still hadn't finalised how the upper and lower panels of each wall were to be fixed together, hence the clamp seen here. We had originally considered using coach bolts, but the wood we had bought was thinner than planned and so not so agreeable to being drilled through. We put this problem to one side for the time being.
Day 2 - August 21
Our progress was frustratingly delayed by four days. We decided to push on and get the four outstanding lower wall panels done first in order that we could establish the footprint of the structure and sort out the angles.
The doorway wall comprised an upper lintel with two vertical panels; we weren't sure we could get the latter built in time and so these were omitted from the design for the time being.
We made good progress; while Paul was cutting the plywood, I began a painting production line. Each panel had to be coated with preservative as the timber wasn't pre-treated.
The photo below shows how the good weather allowed several panels to be treated simultaneously in the open air. The green woodstain took just an hour to dry and be ready for painting. Unfortunately the 4-6 hours required for the paint to dry between coats proved problematic once heavy rain forced the operation under cover.
")
By the end of the day we had five lower and one upper panel assembled, so we pegged them and clamped the upper panel in place as shown the photo below. Even though the pillbox was a dummy and wouldn't have been armed, I couldn't resist setting a Bren gun up on a tripod to see how it looked!
")
Day 3 - August 22
The following day we cracked on with the remaining upper panels and the spar across the top of the doorway wall. The weather was fiendishly hot; however, we knew we had a race against time as torrential rain was forecast.
")
We ended the day by getting the main wall panels assembled. We managed to undertake a trial construction as shown below. We decided that door hinges were the best method of joining the lower panels together. At this point, only the tree branches were holding the upper panels in place.
")
")
The day ended in relief as we had broken the back of the construction.
The timber treatment was finished and one lower panel had had its undercoat of paint completed.
We had also decided how to make the roof; an old tarpaulin was found to fit nicely over the framework, although we still didn't know exactly how it would be anchored.
The atmosphere was more relaxed having got this far, but there was still a lot of painting to be done and extremely bad weather was on the way.
Day 4 - August 24
The following morning I managed to relocate all the panels into my garage; at about midday the heavens opened and it rained solidly for several days.
The photo below shows how cramped it was for the painting of undercoat and top coat on the panels. By this time Paul was back on shift work and so the painting was down to me.
")
Progress was slow; the process involved painting the top edges of panels and front/rear where possible and then waiting for a break in the rain the following day so I could run each panel outside and flip it over in order to expose the unpainted edge.
")
Each panel needed to be painted with an undercoat all over and then a plain top coat on the interior surface.
The exterior face of both upper and lower panels needed the top coat to be textured to simulate a rough concrete surface. At first, it was hoped that a textured paint would be sufficient but tests showed the grain to be too fine.
Handfuls of sand were thrown on and brushed into the wet paint to enhance the texture. At this point, a break in the rain meant the panels could be painted outside laying flat.
Once the downpours recommenced, however, the sand was mixed with the paint in the pot so that it could be painted with the panels standing vertically in the garage; this method was not as effective as adding the sand after the paint was applied, however.
Day 5 - August 25
On Tuesday I was getting a bit disheartened about how much was still left to do; the paint was drying but some means of representing the loopholes was required, and the fitting of hinges on all the panels needed doing.
Working around Paul's shifts, we got the loophole steps (two designs) constructed. A traction engine rumbling past on its way to the showground was a reminder that time was running out.
Day 6 - August 26
I spent Wednesday cooped up in the garage, taking the loopholes through the treatment and painting processes.
Day 7 - August 27
It wasn't until Thursday that I finally believed that we would get the pillbox to a point that it would make it to the show.
We began the first 'proper' construction of the pillbox, starting with the hinges that would hold both the upper and lower panels together. Since the first attempt, we had bought loose-pin hinges, meaning that the hinge plates could remain screwed to the panels and the pins inserted during assembly. This meant that the assembly could be achieved mostly without using screws.
Once the top rail was in place, we finally had a rigid structure; it was a relief to have all these separate components suddenly come together.
")
The pillbox certainly drew some strange looks from motorists in the rush hour traffic! My neighbours went very quiet.
")
Having got to this stage, the pillbox was disassembled and packed away, ready for the showground the following day.
")
Day 8 - August 28
Today was a setting-up day on the showground and also our first full construction of the pillbox.
We found that the entire structure could be flat-packed into a Sankey trailer, with a few bungees and ratchet straps to keep the load secure.
Arriving on site, we marked out the perimeter of the pillbox in string and placed tent pegs to mark each corner to assist in putting up the lower wall panels.
One key aspect was ensuring the walls were level; we brought along all the offcuts of wood from construction to build up the ground level beneath the walls.
Fortunately, the field wasn't as bumpy on our pitch as we had anticipated, and only two walls needed blocks under them to make the pillbox true.
")
It took about two hours from start to finish to erect the pillbox, with Paul, Paula, Russ and myself on the job, which wasn't bad, considering that this was the first time we had levelled the walls and fitted the roof, embrasure surrounds and camouflage netting.
The loose pin hinges made all the difference to the speed at which we could build the structure. Although we had problems in that one pin somehow got bent and another got lost, we muddled through with a combination of improvisation and brute force.
Each lower wall panel was levelled, the hinge to its neighbour pinned and the angle adjusted.
The lower tier went together in record time once the level had been sorted; the upper wall was a bit more fiddley as the hinge plates on the underside and one vertical had to be matched and pinned in place.
")
")
The roof was new territory; all that we knew was that the tarpaulin was just large enough to cover the structure and so we decided to tack it in place using large-headed roofing nails. The tarpaulin overhang was simply folded back onto the roof.
")
Once the roof was on, it was just a matter of deploying the camouflage netting and placing hessian around the base where blocks had been used to level the pillbox. Heavy duty tent pegs were hammered in to anchor the bottom rail of each wall.
")
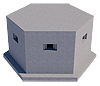
We were highly satisfied with how the pillbox looked from all angles. A roof support was improvised from some aluminium tubing I had in my shed; a patio table proved a useful addition as it prevented the central pole from being knocked.
")
")
Pillbox house-warming
After 11 days of stress we could finally relax, and that evening, we held a pillbox-warming party.
The pillbox was found to be an excellent beer tent, accommodating ten people without much trouble!
Illumination (and atmosphere) was provided by a combination of battery-powered Christmas lights, a hurricane lamp and some army surplus glo-sticks.
It went so well, that we (ahem) decided that we would have to repeat the process on the Saturday and Sunday nights too.
It was quite cosy inside with a groundsheet across the doorway, although the heavy rain on the tarpaulin roof was quite loud. The roof did well, although some minor rain spray occasionally blew in one of the embrasures; this was later blocked up.
")
Show time
The relief of meeting the deadline was such that we almost forgot that we had a three-day show to attend to. The only real worry however, was the heavy rain forecast overnight and on the Monday.
The photo below shows our display set up.
")
We had the Vickers and Bren guns set up outside on their tripods.
")
Reaction to the pillbox
A positive reaction was noted from the very start; even fellow festival displayers (who have seen most things on showgrounds) were very impressed with both the pillbox and the concept of using it instead of our usual gazebo.
These sentiments were echoed by the visiting public, all of whom loved it. One chap looked at the original plans and asked why we hadn't used the diagonal cross-braces on the lower panels. We explained that they were too complex for us to do; his surprised response was "You are professional carpenters aren't you?" We took this as the ultimate praise and he was even more surprised when we told him we were nothing of the sort!
")
Although the Monday was rained off, the SMHS display was an outstanding success; our membership was increased by about 8 per cent over the weekend, which speaks volumes for the pillbox and the quality of our volunteers who did an amazing job of manning it.
Reflections
I was always worried about the weather and its possible effect on the pillbox; in the end, no real problems were experienced. The photo below shows a bulge in the roof tarpaulin caused by an overnight monsoon, but such issues were resolved by pushing the bulge until the water gushed over the edge. We will be modifying a few parts in future, and, of course, finish off the doorway side panels; this will be covered in subsequent posts as and when the work is underway.
")
Archaeological reconstruction
Some of you may well be asking "what about the archaeological reconstruction aspect?"
Well, we've established that two men can build one of these things working over eight separate days. Our project was short of one wall, but a lot of our time was spent in painting multiple coats of paint on both interior and exterior surfaces; I doubt this was necessary with the original design that just needed a cement wash on the exterior.
We don't have a record of the wartime man-hours it would take to build, and our build time was artificially skewed by the bad weather hampering the painting anyway. However, with more people on the job, one of these dummies could probably be put together in a couple of days or even less.
The reconstruction side really comes from how much like a real pillbox our 1941-designed dummy looks; feedback so far is that it is very convincing! Once we've finished the project, we will undertake some aerial photography and assess how well we've done, so watch this space!
")
Otherwise, we're VERY pleased with it!
- Pete

Email:
Blog Latest
Bishopstone reveals its pillbox secrets
18 October 2021
Pillbox or Observation Post?
10 June 2020
Uncovering the hidden secrets of a pillbox
8 June 2019
Review of 2018
31 December 2018

Wartime Christmas in East Sussex (2)
24 December 2018
Jargon-buster
Embrasure
A loophole or slit that permits observation and/or weapons to be fired through a wall or similar solid construction.
Loophole
Embrasure
Pillbox
Generic term for a hardened field defensive structure usually constructed from concrete and/or masonry. Pillboxes were built in numerous types and variants depending on location and role.
SMHS
Sussex Military History Society
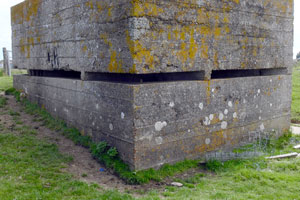
Type 22 pillbox
A small hexagonal pillbox for six men not commonly seen in East Sussex, though a few still survive along the Royal Military Canal stop line.
This site is copyright © Peter Hibbs 2006 - 2026. All rights reserved.
Hibbs, Peter Pillboxes for dummies (Part 3) (2026) Available at: http://www.pillbox.org.uk/blog/239687/ Accessed: 15 July 2026
The information on this website is intended solely to describe the ongoing research activity of The Defence of East Sussex Project; it is not comprehensive or properly presented. It is therefore NOT suitable as a basis for producing derivative works or surveys!